One of the built-in features of the LGfL VoIP system is that it is possible to record all phone calls. This feature can be enabled and disabled at the discretion of the Headteacher only, who needs to log into the VoIP administration site to switch it on or off.
The Headteacher can also assign permissions to staff members to use different aspects of the VoIP site.
The Headteacher Settings section is visible to Headteachers only and does not appear for other users.

Note: If a Headteacher logs into the VoIP site and does not see the Headteacher settings tab in the menu at the top, this indicates it is likely the Head is not given the Headteacher profile in USO. The school's Nominated Contact would need to raise a support case with the LGfL Service Desk and request that this is done.
Enable Call Recording
To enable call recording, the Head Teacher must have an OTP tag registered to their account.
When a school purchases the VoIP system, an OTP tag is provided by Wavenet if the Head does not already have one. This will need to be registered via the USO Support Site.
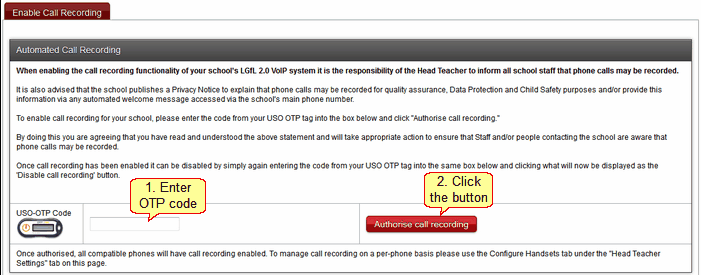
The Enable Call Recording tab provides the interface for switching on recordings. The Head Teacher should carefully read the text on the page. Then, the Head must enter an OTP code (produced by pressing the button on the OTP tag) and clicking Authorise Call Recording.

After this is done, all phones capable of being recorded will automatically start recording conversations. To exempt some phones from being recorded, the Head Teacher can use the Configure Handsets tab, which will appear automatically.
Configure Handsets
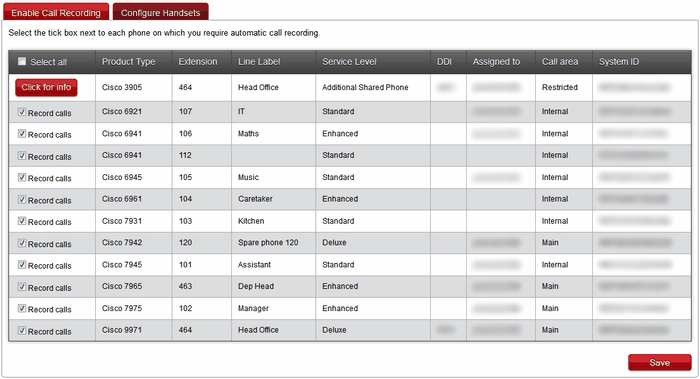
By default, all phones will be switched to record as soon as the recording is enabled. This tab lists individual phones and allows certain phones to have recording switched off.
Simply untick the box next to the phone you do not wish to have recorded. Click Save when done.

|
The Headteacher can grant all the permissions required for different users to access different areas of the VoIP administration website. This is done via the User Management page.
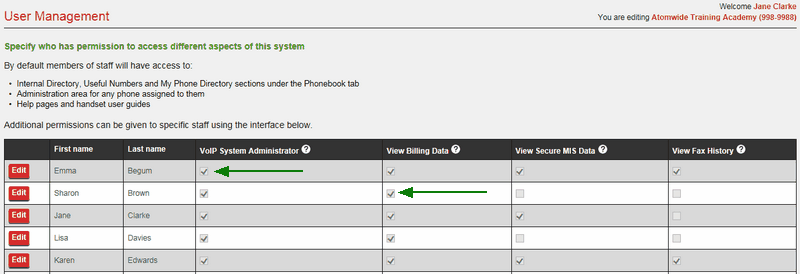
This page lists all members of staff and allows for permissions to be set against each one.
In the image below, the users already have permissions granted to them. This is indicated by tickboxes which appear as ticked.

To grant permissions to a user, find their name in the list and click the Edit button to the left of the name.
When the interface opens, tick the box under the relevant column heading (ie the permission you want the user to have). Then click Update to save.

Once the change has been saved, the user will be able to make use of their new permissions straight away by logging into the VoIP website.

To remove a permission from a user, simply perform the process described above but un-tick the box instead of ticking it.
|


